 Pin It
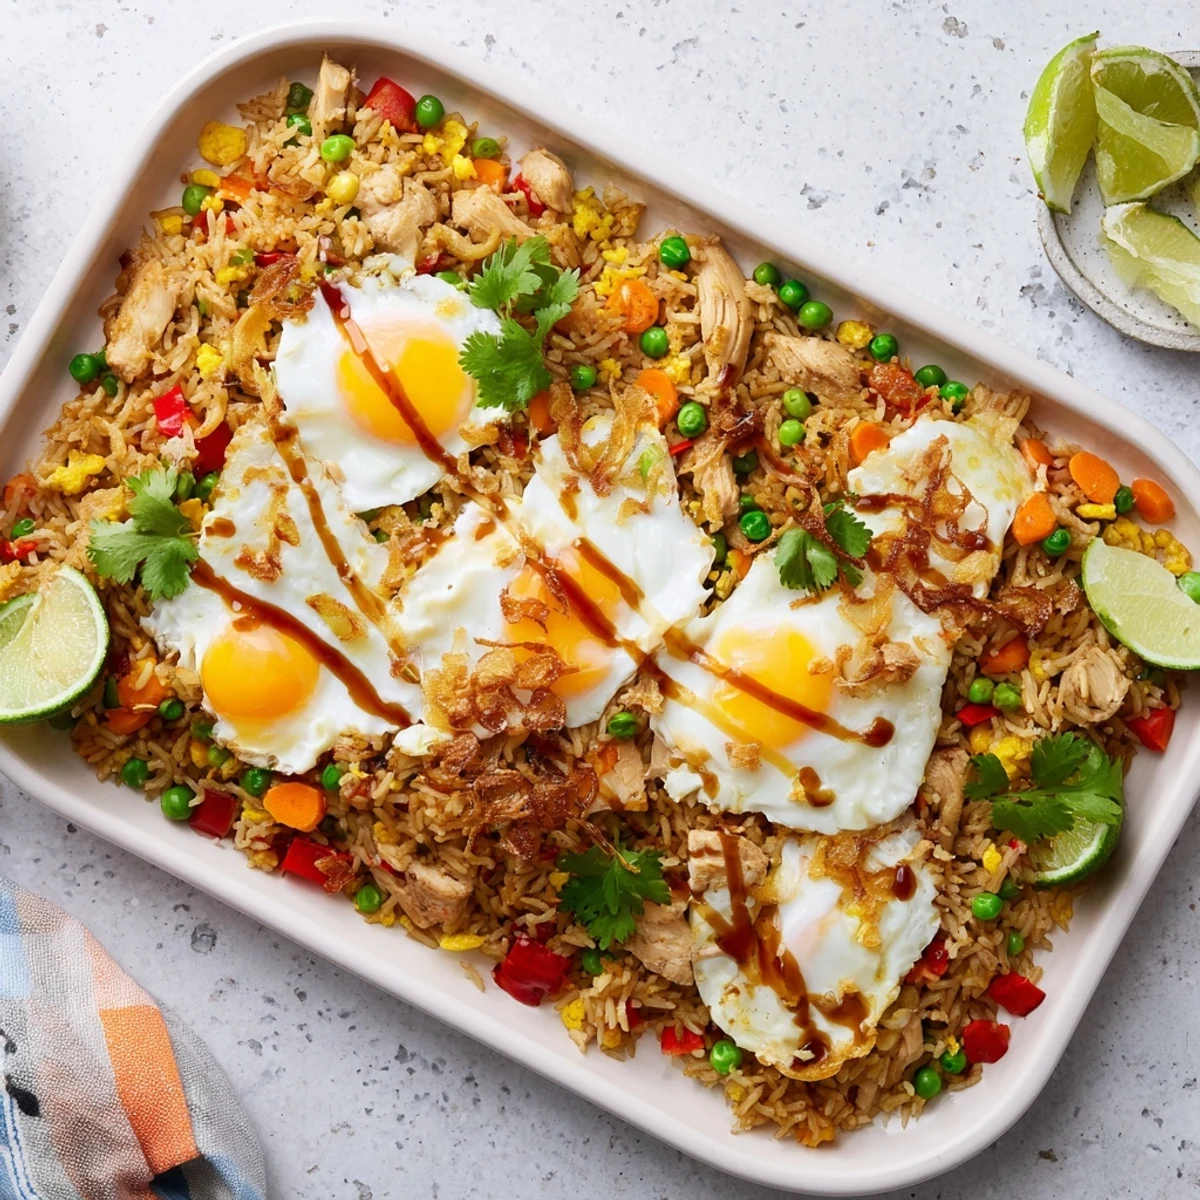
 This tray bake transforms the beloved Indonesian fried rice into an effortless oven meal. Uncooked long-grain rice is layered with aromatic vegetables and marinated chicken, then simmered in a rich blend of kecap manis, soy sauce, and warm spices. After 30 minutes covered, the foil is removed to reveal perfectly cooked rice, ready for three wells to be cracked with eggs. The final bake sets the eggs with gloriously runny yolks while the edges of the rice become lightly crisp. Finished with fresh spring onions, crispy shallots, and zesty lime, it's a complete meal that captures all the complex flavors of traditional nasi goreng with minimal hands-on time and just one pan to clean.
The first time I made Nasi Goreng this way, I was skeptical about baking fried rice in the oven. But that smell of kecap manis caramelizing with garlic and cumin filled my entire apartment, and I knew something magical was happening. My roommate wandered in, drawn by the aroma, and we ended up eating straight from the tray while standing at the counter. Now it's my go-to when I want all the comfort of fried rice without standing over a wok for an hour.
Last winter, my sister came over exhausted from a twelve hour shift at the hospital. I threw this tray together, and we sat on my living room floor watching bad movies and picking at the rice until the tray was scraped clean. She texted me the next day asking for the recipe, which is basically her highest stamp of approval.
Ingredients
- 2 large chicken breasts: Cutting them into bite sized pieces ensures they cook through evenly and absorb all those aromatic spices
- 3 large eggs: Crack them into wells during the last ten minutes for that perfectly set white and gloriously runny yolk
- 300 g long grain rice: Rinse until the water runs clear to remove excess starch for fluffy separate grains
- 1 large onion: Finely chopped so it sweetens as it roasts and blends into the rice
- 2 cloves garlic: Minced fresh because garlic powder just does not deliver that punchy aroma
- 1 red bell pepper: Adds little pockets of sweetness and a pop of color against the golden rice
- 100 g frozen peas: No need to thaw first, they cook perfectly in the simmering liquid
- 2 spring onions: Fresh slices on top add a crisp onion bite that cuts through the richness
- 1 small carrot: Grated so it almost melts into the rice providing subtle sweetness
- 3 tbsp kecap manis: This thick sweet soy sauce is non negotiable for authentic Indonesian flavor
- 2 tbsp soy sauce: Balances the sweetness with salty depth
- 1 tbsp sriracha: Optional but that gentle heat makes everything sing
- 1 tsp ground coriander: Earthy and floral notes that round out the spice blend
- 1 tsp ground cumin: Adds warmth and that unmistakable curry house fragrance
- 1 tbsp vegetable oil: A light drizzle helps everything roast and get those crispy edges
- Salt and pepper: Season generously as the rice absorbs a lot of flavor
- 2 tbsp crispy fried shallots: The garnish that takes it from home cooking to restaurant quality
- Fresh cilantro leaves: Bright herbaceous freshness to lift the heavy spiced rice
- Lime wedges: A squeeze cuts through the richness and wakes up all the spices
Instructions
- Preheat and Prep:
- Crank your oven to 200°C and give a large baking tray a quick slick of oil while it heats up.
- Season the Chicken:
- Toss your chicken pieces with one tablespoon of soy sauce and a generous pinch of salt and pepper.
- Build the Base:
- Spread that rinsed rice across your tray like a canvas then scatter in onion garlic bell pepper carrot and peas.
- Make the Sauce:
- Whisk together kecap manis remaining soy sauce sriracha coriander cumin and 700 ml of boiling water until combined.
- Assemble:
- Pour that fragrant liquid over the rice and vegetables then nestle the seasoned chicken pieces on top.
- First Bake:
- Cover tightly with foil and bake for 30 minutes letting everything steam and meld together.
- Add the Eggs:
- Uncover and stir gently then make three little wells and crack an egg into each one.
- Final Bake:
- Return to the oven uncovered for 8 to 10 minutes until whites are set but yolks remain gloriously runny.
- Finish and Serve:
- Scatter with spring onions crispy shallots and cilantro then serve with lime wedges for squeezing.
 Pin It
 My aunt who lived in Jakarta for years told me that real Nasi Goreng is never made from scratch but always from yesterday's leftover rice. This tray bake version gives you that depth of flavor without the planning ahead.
Making It Your Own
I have swapped chicken for prawns during summer and added extra vegetables when my garden was overflowing with produce. The method is forgiving and the flavor profile works with almost any protein you have on hand.
The Perfect Rice Ratio
The secret is getting exactly the right amount of liquid so every grain cooks through but still stays separate. Too little and you get crunchy bits too much and it becomes a sticky mess.
Serving Suggestions
This dish really shines when served family style right from the tray letting everyone dig in together.
- Keep some extra sriracha on the table for the heat lovers
- Cold slices of cucumber help cool the palate between bites
- A crisp lager or chilled white wine pairs perfectly with the sweet and spicy notes
 Pin It
 There is something deeply satisfying about a one tray meal that tastes like you spent hours at the stove but actually left you free to enjoy your evening.
Recipe Q&A
- → Can I use cooked rice instead of uncooked?
-
This method specifically requires uncooked rice as it steams in the seasoned liquid during baking. Using pre-cooked rice would become mushy and wouldn't absorb the flavorful sauce properly.
- → Is kecap manis essential?
-
Kecap manis provides the signature sweet-savory Indonesian flavor. If unavailable, mix equal parts soy sauce and brown sugar as a substitute, though the authentic taste will be slightly different.
- → Can I make this vegetarian?
-
Absolutely. Replace the chicken with firm tofu cubes or extra vegetables. The cooking time remains the same, though you may want to add the tofu halfway through to prevent overcooking.
- → Why cover with foil first?
-
The foil creates a steaming environment that allows the uncooked rice to fully cook and absorb all the seasoned liquid. Removing it later helps evaporate excess moisture and creates those crispy edges.
- → How do I know when the eggs are done?
-
The whites should be fully set and opaque while the yolks remain slightly jiggly for a runny consistency. For firm yolks, bake for an additional 2-3 minutes.
- → Can I prepare this ahead?
-
You can chop all vegetables and marinate the chicken up to a day in advance. Assemble and bake just before serving for the best texture and freshest flavor.
